Showing posts with label Chassis. Show all posts

Wednesday, 9 September 2020

Roll Bars Part 6

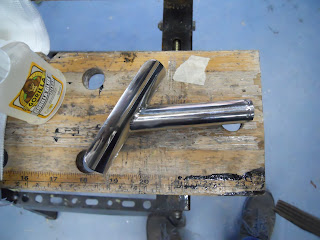
 After much debate on what to fill the bars with went for the original idea of foam like everyone else ,Found some high density expanding foam from screwfix ( other brands available !!!) and used that . 

first wet the roll bars and then discovered that the tube is not linked at the weld so needed to fill that bar separately .

Used an extension tube on the foam to make sure we got all the tube filled ,sorry no pics as such a messy job .then put the bolts back in to protect the threads .


Once this had dried is was back in the car again to check the final fit in order to gat the bars to sit parallel had to place 2 washers under the rear bar on the left hand side .

I have opted for the single head rest support which needs to be drilled in the rear downpipe .


using a piece of string we were able to find the mid point so the head rest would look central.
Drilling them was an absolute nightmare ,Tried my cheap drill first unsurprisingly no luck .closely followed by the drills I bought at Stoneleigh again with limited success,then after much abuse from Steve he arrived with his "decent drills" and sorted .


 happy with that but unfortunately managed to scratch the top of the roll bars, so needed to take them out again to be re polished, Huge thank you to John at Alpha circle (Grimsby)  for sorting them out for me ,   

and so 

 its on to fitting the rubber seals and cover plates .

The outside cover plate needs bending to follow the contour of the car and after  much thought bending it round a scaffold tube seems to work the best ( need to remember to bend it first before drilling the 4 mm hole to secure it other wise the ring will kink on the hole. 


bent and ready to be bolted down .

Thursday, 13 June 2019

Top plate of chasis

Had a little time left so marked the top plate ready to drill the hole for the gear shifter
marked the centre of the shifter and drilled a 90mm hole to give me plenty of room
filled smooth and refitted will be coming off again to fit some rubber round the hole and will be a lot easier to fill the gear box though the shifter hole once the oil arrives.
 Note Manual gearbox but needs ATF dextron III oil 4 litres.


Add caption

Filled out and temp fitted

cooling system part 1

Fitted the radiator  but didn't have the fixing kit (2 bits of pipe!) so used 16mm grommets which seemed to work so I could figure out haw the pipe work went.
Again Dales blog to the rescue
And I realised that the header tank needs rivnuting  to the cross member ,used 8mm rivnuts  and made sure the pipe was in line from the engine .
Header tank fitted with pipes still loose
Then it was just a simple task to fit the other side again only loose as it will all have to come off when I collect the heater pipes .


Pipe fitted but will need trimming level


Fitting the Cooling Fan


I Bought the fan from GD together with the kit and it was a 16inch one that can fit in front or behind.
After studying thermo dynamics on the internet and confusing my self it doent appear to matter were the fan goes but slight favour to the fan sucking the air though !!


 So I decided to fit one fan behind the radiator.

Mounting the fan

 The kit comes with 2 stainless bars pre drilled for pop rivets and has bolts welded for the fan

The principle is to fix the bars to the radiator, then fix the fan to the bars.
First issue I had was the fan has curved blades and clearly marked as "pushing"  but I wanted to suck
so simple job of reversing the blades  

Blades reversed and now will suck to the cardboard
Next the cheek nipping bit. I fitted the fan to the bars  placed the fan in the middle of the rad marked the position of the bars and drilled the holes corresponding to the holes already drilled at the end of each bar onto the radiator frame. All the blogs I have read say that you cant go into the radiator but it looked to me like there was a chance so very carefully drilled the holes and fitted pop rivets .


Tuesday, 21 May 2019

Chassis

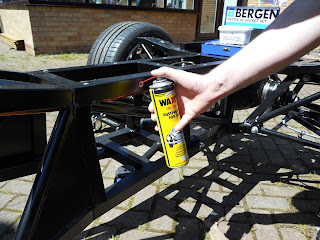
Chassis home safe  first job was to place wax oil in the recess to stop any rust
Did this by removing the body stops and just spraying both ways might help might not

home safe and sound

used 2 tins not a lot
 

Wheels and Chassis

Decided on the wheels early on (well the wife did ) 18 inch so ordered those and had them sent to Andy to make the chassis roll a little bit better


together with tyres sport pilot like other cobra drivers
 
Next great phone call was the rolling chassis is ready  so off I go to pick it up together with the next build kit .


Its Christmas